Earn money selling original 3D car part models.
Start sellingEarn money selling original 3D car part models.
Start sellingEarn money selling original 3D car part models.
Start selling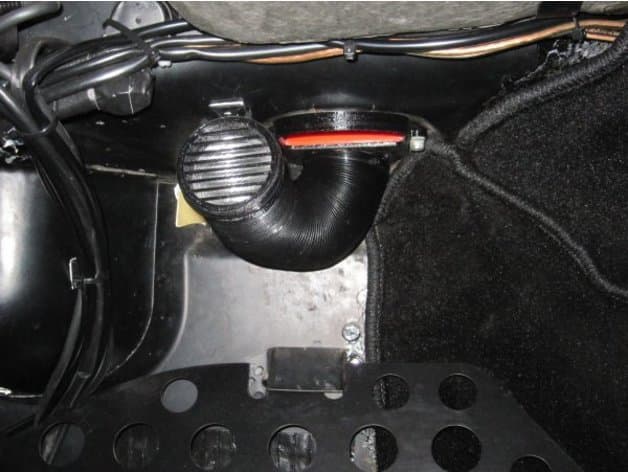
Files stay with the original publisher; this catalog entry does not grant hosting or resale rights. License status does not verify vehicle fitment, OEM rights, design patents, or safety.
Shared by
Stefan Hollaus (austria3)English This is my take on a refined version of the factory deflector plate for the foot well vent / blend valve and the ‘snorkel’ modification shown at the ElectroCooler install manual. it contains 3 files - cover - vent - dividing wall (tw) the new cover is installed instead of the original cover with the original screws, the dividing wall fits into the cut out on the inside of the cover and is secured with a drop of super clue. Make sure the direction of the triangle shape of the dividing wall does fit the shape of the blend valve (left and right side of the car is different!), I used a small piece of pre compressed tape to close the gap (the factory blend valve does tend to wrap a bit). Use half of the length of the 50mm pipe provided with the ElectroCooler. The pipe is secured to the cover with a cable tie (250mm long). The vent is secured to the other end of the pipe with a cable tie and positioned in the car with a self-adhesive mounting base. I did use PETG in black as printing material with the standard setting: heat bed temp 70°, nozzle temp 230° ---------------------------------------------------------------------------------------------------------------------- Deutsch: Dies ist meine Version der Abdeckung für die Fußraumdüse die den ‚Schnorchel‘ aus der Einbauanleitung des ElectroCooler mit einbezieht. Es besteht aus drei Teilen: - Abdeckung Fußraumdüse / cover - Abdeckung Schlauchende / vent - Trennwand / dividing wall (tw) Die Abdeckung der Fußraumdüse wird anstelle der originalen Abdeckung mit den originalen Schrauben befestigt. Die Trennwand passt in die Ausnehmung auf der Rückseite der Abdeckung und wird mit einem Tropfen Sekundenkleber gesichert. Achtung auf die Orientierung der dreieckförmigen Trennwand, diese passt genau in die Aussparung der originalen Fußraumdüse. Einen eventuellen kleinen Spalt habe ich mit Compriband abgedichtet. Den beim EloctroCooler mitgelieferte 50mm Schlauch in der Hälfte teilen. Ein Ende des Schlauchs in die Aufnahme der Abdeckung der Fußraumdüse stecken und mit einem Kabelbinder (Mindestlänge 250mm) sichern. Auf das andere Ende des Schlauch die Abdeckung stecken und ebenfalls mit einem Kabelbinder sichern. Mit einem Klebesockel kann dieses Ende nun im Fahrzeug platziert werden. Als Druckmaterial habe ich PETG in schwarz verwendet. Druckeinstellungen Standard: Bett 70°, Drucktemperatur 230°.
Originally published on thingiverse.com by Stefan Hollaus (austria3) · License: CC BY-NC-SA
Browse categories
Jump to interior, exterior, accessories, dashboard, mechanical, or tools hubs when you need a different kind of replacement part.
Share whether this print actually fits a real car. Installed photos and material notes make the catalog more trustworthy.
Other projects by us
Building tools that make life easier
Start a fitment, printing, or design discussion with this part already attached.



