Earn money selling original 3D car part models.
Start sellingEarn money selling original 3D car part models.
Start sellingEarn money selling original 3D car part models.
Start selling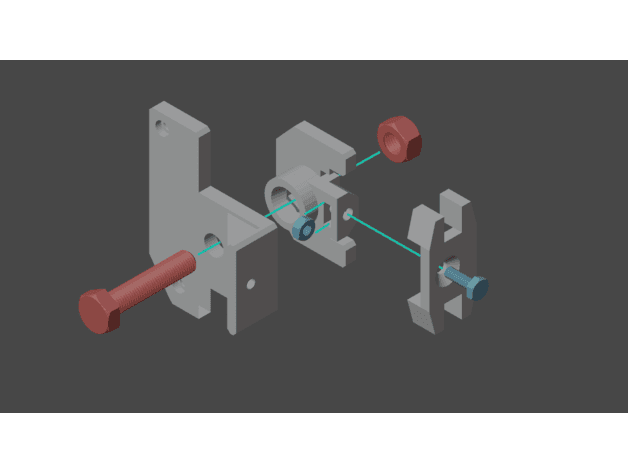
Reference shelf
Product references matched to the published material guidance. Confirm diameter, heat resistance, colour, and printer compatibility.
| Referenced item | What to verify | Price & availability |
|---|---|---|
| PETG filamentAmazon · Affiliate link | Amazon product page for 1.75 mm PETG; confirm colour, spool size, print temperature, seller, and delivery region. | Check price at Amazon |
| ASA filamentAmazon · Affiliate link | Amazon product page for 1.75 mm ASA; use an enclosure and suitable ventilation, and confirm seller and regional availability. | Check price at Amazon |
Affiliate disclosure: if you buy through an eligible link, 3DPrintedCarPart may earn a commission at no extra cost to you. As an Amazon Associate I earn from qualifying purchases. Confirm product specifications, compatibility, seller terms, and vehicle safety before ordering or using anything. Amazon may redirect you to a nearby supported store; otherwise the original Amazon.com page remains available.
The file license permits commercial reuse, subject to any applicable attribution or share-alike terms. License status does not verify vehicle fitment, OEM rights, design patents, or safety.
Shared by
Marcello Chirri (MrLezzident)Plate and M6 nut holder to fix the broken tab in the E46 pre-facelift tail light bulb holder. It's been tested in a 1999 E46 320i with the orange turning signal. Required parts for each side: - M6 Bolt with 30mm long thread (25-40mm should work as well) - M6 Nut - M3 Bolt with 10mm long thread - M3 Nut - 3 small self tapping screws (I used some 2.5mm diameter by 10mm thread length) - M6 Washer (optional) Insert the M6 nut into its designated hole in the Main_Piece, it should not come out but have some play so it can rotate a bit if needed. Then insert the M3 nut as seen in the exploded picture. Then insert the Main_Piece part in the two holes of the tail light, with the M6 nut part facing outside the car. Put the Main_Piece_Holder in the opposite side so that the hole for the screw is closer to the inside of the car, and then secure it with the M3 bolt. Then I'd advise to set the light bulb holder in place, secure it with the M6 bolt and mark the holes for the self tapping screws. The two screws facing the same direction should be enough to secure everything, if you plan to use the third one facing the trunk light be careful not to poke a hole into the bulb facing inside the trunk. Remove the bulb holder again, pre-drill a guide hole for each self tapping screw and secure the plate. At this point secure everything with the M6 bolt again and you should be finished.
Originally published on thingiverse.com by Marcello Chirri (MrLezzident) · License: CC BY
Browse categories
Jump to interior, exterior, accessories, dashboard, mechanical, or tools hubs when you need a different kind of replacement part.
Share whether this print actually fits a real car. Installed photos and material notes make the catalog more trustworthy.
Other projects by us
Building tools that make life easier
Start a fitment, printing, or design discussion with this part already attached.



