
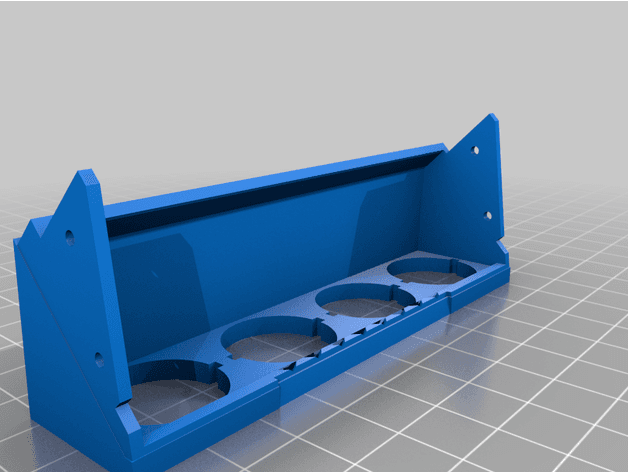
Anytone Smart / Albrecht 6110 10/11 meter VW Polo overhead console
Print this part
Use the part context as a starting point, then confirm geometry-dependent values in your slicer.
Files
Source link only
No hosted model files
Material start
PETG or ASA
Saved part guidance
Strength start
20-30% infill for durability, with 1.6-2 mm walls
Saved part guidance
Orientation / supports
verify in slicer
Exact totals
Slice for grams + time
Model geometry and final settings determine both
Vehicle exposure
Cabin/interior use; avoid high-heat zones
Download the model at its source, then confirm the format is supported by your slicer. Exact grams, time, and final support placement come from the actual slice. Test-fit and heat-check the part before installing it in a vehicle.
License & use
Files stay with the original publisher; this catalog entry does not grant hosting or resale rights. License status does not verify vehicle fitment, OEM rights, design patents, or safety.

Shared by
3DPrintedCarPartDescription
8 Mars - Updated with version 3 - Code name "Buttons" Could one ever have to many buttons? Answer: No! Anyway i needed more buttons and i wanted some speakers up there as well. to accomodate any future changes, thoughts and/or ideas i decided to break it up into 3 parts that way it is easier and faster to print only the part that needed change.:) I'm not alll satisfied with the latest files (some fixes are needed) so they are marked Beta for now. I will set the Tinkercad files to public as well if anyone wants to modify them for their own use. Buttons are still 20mm i did make the holes in the 4xswitch panel slightly larger this time and the switches are not final. i have so far wired switches for console on permanent or via ignition. microphone switch between the radios, 10m amplifier remote on, and reverse light permanently on or via reverse sense. the last two switches will be for my future antenna tilt mounts (still waiting for elctric motors to arrive then that project will be up here to) I wanted a way to mount my 10meter / CB radio out of sight in my car and figured the best place would be in the ceiling were the blank cover for the optional sunglases compartment is located, so I made this. I also wanted to add another radio front panel and a few switches so there are two (currently) versions as well as a Tinkercad link for those that want to modify to suit their own needs. Switches are 20mm (tight fit made the holes 19.5mm) I have also midifeid my radio to have the microphone connected out the rear as well as have a rotary encoder channel selector and built in RB (in case someone ask about the extre knob on the front were the mic cord originally comes out) Some thoughts... find way to reroute condenesd water from inside of the roof so it doesn't drop down onto the radio (I have added a bent plastich sheet in my installation) Since I wanted it to be as dificult as possible to steal it I have no spring tabs on the side holding it so you need to take the light dome down and install the radio first sliding it towards the rear it makes a tight fit, then install back the light. rememeber it will be hard to get it out once it is installed so double check wirings and test everything before snapping the light back!:) Have fun and post makes or share your own creations! 73 TinkerCad: https://www.tinkercad.com/things/bg9Ya811Nv0
Compatible Cars
Originally published on thingiverse.com by Anders Richardsson (SM6WGG) · License: CC BY-NC-SA
Share whether this print actually fits a real car. Installed photos and material notes make the catalog more trustworthy.
Related Parts
Finding specific fitment/category matches first.

