Earn money selling original 3D car part models.
Start sellingEarn money selling original 3D car part models.
Start sellingEarn money selling original 3D car part models.
Start selling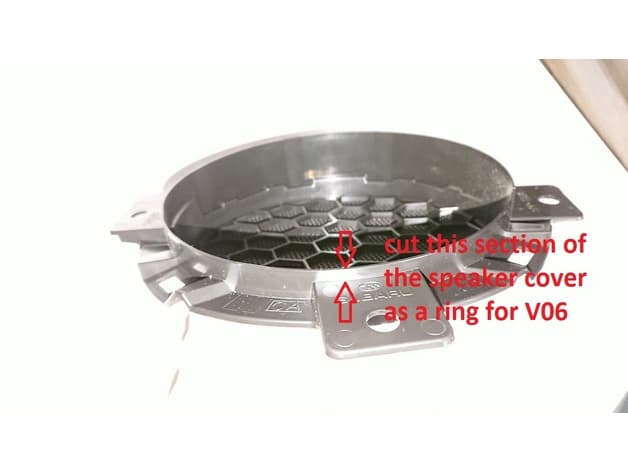
Reference shelf
Product references matched to the published material guidance. Confirm diameter, heat resistance, colour, and printer compatibility.
| Referenced item | What to verify | Price & availability |
|---|---|---|
| PETG filamentAmazon · Affiliate link | Amazon product page for 1.75 mm PETG; confirm colour, spool size, print temperature, seller, and delivery region. | Check price at Amazon |
| ABS filamentAmazon · Affiliate link | Amazon product page for 1.75 mm ABS; use an enclosure and suitable ventilation, and verify temperature requirements and seller. | Check price at Amazon |
Affiliate disclosure: if you buy through an eligible link, 3DPrintedCarPart may earn a commission at no extra cost to you. As an Amazon Associate I earn from qualifying purchases. Confirm product specifications, compatibility, seller terms, and vehicle safety before ordering or using anything. Amazon may redirect you to a nearby supported store; otherwise the original Amazon.com page remains available.
The file license permits commercial reuse, subject to any applicable attribution or share-alike terms. License status does not verify vehicle fitment, OEM rights, design patents, or safety.
Shared by
Sven Wuerkner (TRS84)ATTENTION: Version 05 (V05) has been tested and I found out that the bolt pattern towards the front door is incorrect! I changed the model to a bolt pattern which is fine now. This new Version 06 (V06) is tested and works fine. Further Information below. This is a Door Speaker Adapter for Toyota GT86/Scion FR-S/Subaru BRZ. It is a full redisign of Schankenstein´s Speaker Adapter. It also features a rainshield, which is allways very important to have. It is made for the Andrian Audio A165V and A165G speakers, Status: -V05 Printed and tested -> fitment to speaker OK, fitment to car NOT CORRECT -V06 Printed and tested -> works fine, OEM speker cover in doorboard need to be cut back slightly (see pictures) -V06.1 Not Printed or tested, but should work perfect without cutting anything. Therefore, heigth is reduced by 4mm. Note: -Even if the position of the door speaker is less critical in case of the FT86 compared to other cars, there is still a risk to guide water, dripping down from the window slot, into the interior of the car when installing aftermarket speakers. Most OEM speakers include a rainshield, but this is often erased when aftermarket speakers are installed. Instructions: -Use PETG or ABS. Materials like PLA will not withstand the heat and stress of this application. Furthermore, accoustics could be affected in a negative way. -Print with the speaker flange facing the print bed. -Use supports. Printbed touching, 70° overhang angle. -Print with 100% infill, but take care to really use infill and not maximum bottom layer count. (in CURA) Set bottom layer / top layer count to 3. Otherwise you might get a slow and/or a weak print. -Make sure to use a good overlap between infill and inner wall to get a strong print. -Use zig zac or lines as infill patern to get a strong print. Do not use concentric patern. -Take care that there is no concentric gap inside of the print in the area of the rainshield. You might need to play arrond with lines width of the inner walls. Installation: -drill hole(s) for speaker cable as necessary, drill in upper section to avoid water getting to the inside -install speaker in a clocking where terminal is NOT pointing downward! best position is terminal pointing to rear end of car. -keep speaker cable long enough to that it generates a downward pointing ellbow inside of the door, this is important to make sure that any water drops flowing down the cable drip of at the lowest point of the ellbow, so no water comes to the speaker/terminal and from there down the chasis and maybe to the interior -use butyl rope to seal the gab between adapter and door metal, usually this butyl rope is 10mm thick, thats to much, stretch it so hat it has a diameter of about 5mm and apply it the backside of the adapter -heat up the door metal directly before application of the prepared adapter with a hot air gun, butyl has a much better adhesion and is easier to form when its a little hot; little more then hand warm is enough -press down adapter firmly before tightening the screws until it touches the plastic threaded rivits which was also used for the OEM speaker -us the OEM screws for fixing the adapter finally, thru holes should be drilled manually to a diameter of 6,5 or 7mm (they are intensionally sligthly to small in the model) -install the speaker, rember to form a ellbow in the cable.
Originally published on thingiverse.com by Sven Wuerkner (TRS84) · License: CC BY
Browse categories
Jump to interior, exterior, accessories, dashboard, mechanical, or tools hubs when you need a different kind of replacement part.
Share whether this print actually fits a real car. Installed photos and material notes make the catalog more trustworthy.
Finding specific fitment/category matches first.
Other projects by us
Building tools that make life easier
Start a fitment, printing, or design discussion with this part already attached.


