
Chrysler/Dodge/Jeep Replacement Antenna
Print this part
Use the part context as a starting point, then confirm geometry-dependent values in your slicer.
Files
Source link only
No hosted model files
Material start
PETG or ASA for durability and heat resistance
Saved part guidance
Strength start
20-30% infill for a balance between weight and strength
Saved part guidance
Orientation / supports
verify in slicer
Exact totals
Slice for grams + time
Model geometry and final settings determine both
Vehicle exposure
UV/weather exposure — ASA is the starting point
Download the model at its source, then confirm the format is supported by your slicer. Exact grams, time, and final support placement come from the actual slice. Test-fit and heat-check the part before installing it in a vehicle.
License & use
Files stay with the original publisher; this catalog entry does not grant hosting or resale rights. License status does not verify vehicle fitment, OEM rights, design patents, or safety.

Shared by
3DPrintedCarPartDescription
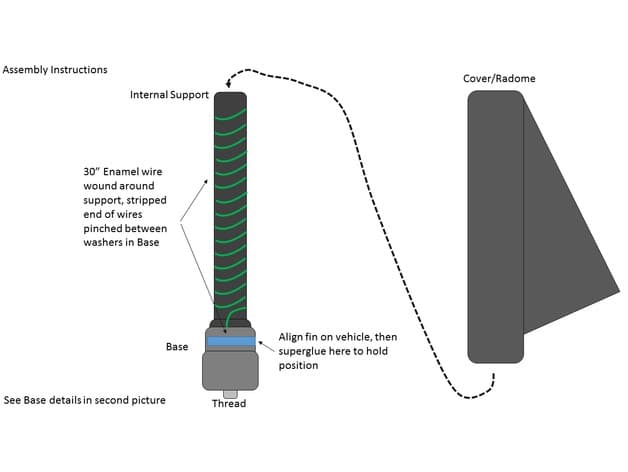
The stock mast hits my garage door when I am pulling in/out, so I designed a shorter antenna; if you wanted shorter, you could probably do so just by shortening the cad files. This antenna mast is for a 2008 Jeep Liberty, however it should be the same as used on the Dodge Nitro, Journey and Avenger, and Chrysler Sebring/200 around those model years. It will require a M5x16 screw, M5 nut, two washers, and about 30" of wire (I used enameled wire) as well as superglue or adhesive of your choice. The design can be easily adapted to other models if the dimensions are close by modifying the attachment threads, however you'd have to figure out which specific hardware to use. The design is three parts: Base: Two files provided, one with hex cutout for nut and one without. This holds the screw and nut and is where the wire is connected. The threads will need to be tight enough to the base to where they will not spin when the assembly is being screwed on or off the car, otherwise you will have to cut the antenna open and unscrew the screw from the car. For my application, I used the hex cutout base and put the nut in the pocket (M5) and put the screw, washers, and wire in through the other side. Internal: This is to wrap the wire around. I used 30" to be roughly a 1/4 wavelength on the FM band. If you are not using wire for the antenna metal, you don't need this. Cover/Radome: This covers the internals and keeps it from getting wet. I added a fin because why not, but if you want something more bland or more crazy, the freecad file is available, Assembly: For the Base, after wrapping the stripped wire around the screw, I superglued the nut and tightened the screw all the way to ensure the thread assembly was secure to the plastic, to avoid not being able to twist the antenna off if the housing started to spin on the thread. I then put the internal support into the base and wrapped the wire around the support. You can use the holes to secure the wire or tape. 30" is roughly a 1/4 wavelength around 100MHz, you can use less but it might not have as good reception. Once the wire was all wrapped, I put the housing onto the base. I then screwed the base onto the car to align the fin with the rear when it was fully seated. I superglued the housing to the base to keep the alignment. Once it dried, I unscrewed the entire assembly and will probably be painting it. One downside to note: I used PETG, so this is quite a bit stiffer than the old mast. Hopefully it will break before it damages the car base if it hits something.
Compatible Cars
Originally published on thingiverse.com by Andrew Johnson (ajohns1288) · License: CC BY-NC-SA
Share whether this print actually fits a real car. Installed photos and material notes make the catalog more trustworthy.
Related Parts
Finding specific fitment/category matches first.

